Prepare Coconut

by Nancy on August 30, 2011

in Fruit,Tips and Tricks

Most grocery stores only carry one kind of dried coconut. It’s very fine and very sweet. It doesn’t taste much like coconut either so about all I buy it for is making tinted Easter grass for decorating cookies and cakes. When I want coconut with real coconut taste, I go to a store that carries bulk foods (Whole Foods where I live). I can usually find a large-flaked, unsweetened coconut in the bulk bins. You can also order this large-flaked coconut from Bob’s Red Mill who is a supplier of bulk ingredients and who has been a sponsor of Kuchen Together supplying us with some ingredients for our recipes (although I bought my last supply of large-flake coconut from the store). The 3.5 lb. mail order size is pretty big but you can freeze dried coconut to keep it fresh.

Sometimes the large-flaked coconut still isn’t large enough for what I want. In my trail mix I want coconut chips! I’ve never seen chips in a store so I have to make them myself. I do live in a culturally diverse area where fresh coconuts are available in the supermarkets year round. Preparing your own fresh coconut isn’t hard but it is a little time consuming. Plan half a day to complete the process. Select an “old” coconut. Recently I’ve seen “young” coconuts in the stores along side “old” coconuts. Young coconuts are not fully developed and the coconut meat inside is still in a jelly stage. Some people will split open a young coconut and eat the insides with a spoon like pudding.
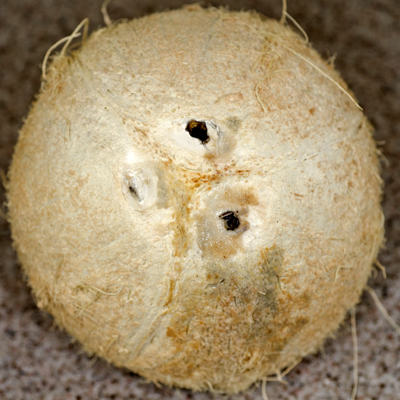
With a large nail and hammer, pierce two or three of the eyes in the coconut.
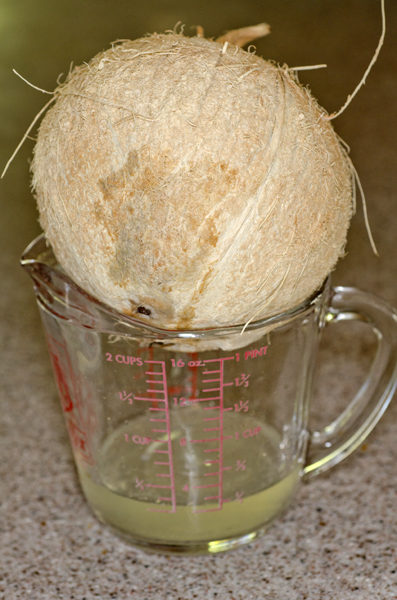
Turn coconut upside down over container to drain. You have to leave at least one hole a little “up” from the others so air can get into the interior of the coconut as the liquid drains out. If the liquid doesn’t drain, make the holes larger.

Place coconut in 300 degree oven for 30-45 minutes. If you are lucky, the shell will split.
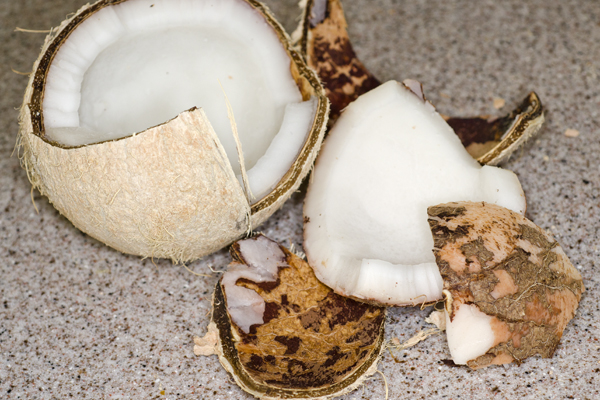
Use a hammer to break into the coconut if it didn’t split and then to break it into smaller pieces.

Wedge a thick-bladed knife between the shell and the meat working around the inside of the shell until the meat comes free.
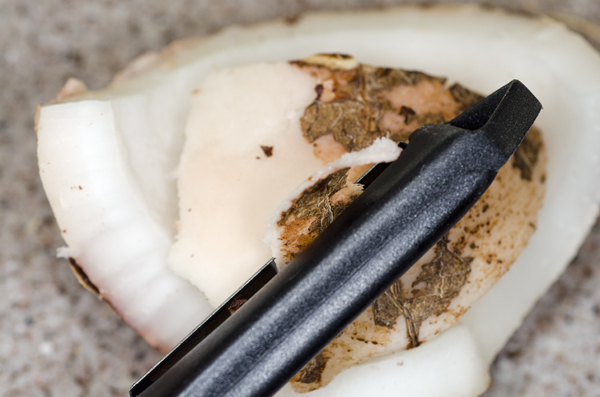
Peel the skin from the outer surface of the meat with a potato peeler.

Slice or grate the meat to the size you want. For my trail mix I cut the meat into 1″ wide strips and then slice it about 1/16″ thick.

Fresh coconut can be stored in the refrigerator for a few days or in the freezer.

For dried or toasted coconut, place sliced or grated coconut in a single layer on a flat tray. Bake at 200 degrees (or as low as your oven will go) checking and stirring every 15 minutes for grated coconut or 30 minutes for sliced. The coconut will dry and then brown. Remove when it is as dry as you like. Store as for fresh coconut.

For my trail mix the coconut slices (or chips) need to be very dry or moisture from the coconut will melt the candy coating on the chocolate pieces. Dry and toast the coconut until it is brown over at least half of the chip’s surface. Check for dryness before adding to trail mix by placing coconut in a container with a few chocolate pieces. Leave 1 day and see if the candy coating melts or not. If it does, place the coconut back on a tray in the oven and dry some more.


{ 0 comments }
Haupia

by Nancy on August 23, 2011

in Desserts,Snacks

Aloha! Carrie and I are in Hawaii so, of course, we have to feature a Hawaiian food this week. Haupia is a coconut milk pudding that is served at luaus and social gatherings. I first had haupia 30 years ago at a picnic on the Big Island hosted by some colleagues who had lived and worked there for several years. I even got the recipe!

Haupia is referred to a pudding in most recipes. It is similar to Vanilla Pudding that we published a few weeks ago. Coconut milk replaces at least half of the milk, in this recipe it replaces all of the milk but you could use up to half milk. Haupia should be stiff enough to be picked up and eaten as a finger food. This is accomplished by doubling the cornstarch. Haupia was originally made with pia – arrowroot starch – and you could use that instead of cornstarch in the same portion. Keep servings small, coconut milk is a laxative in large quantities.

Coconut milk is not the liquid in the center of a coconut, that is coconut water. The milk is made by grating coconut meat, mixing it (either fresh or dried) with equal parts boiling water, letting it sit 20 minutes and then draining. The liquid you drain off will be white and is the coconut milk you use. You can make it yourself and I have but the quality and flavor varies a lot. It’s better (and easier) to just buy coconut milk in a can if your grocery store carries it. Look in the Asian section.

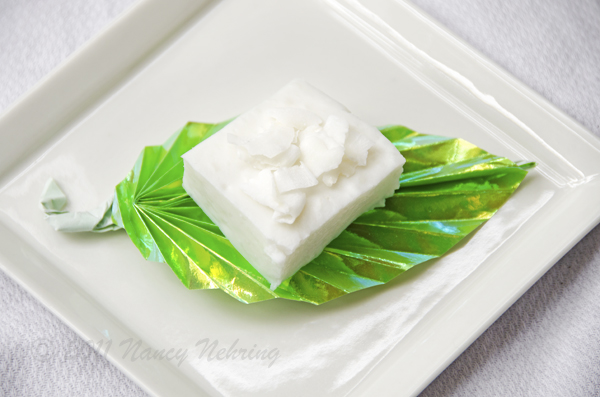
Haupia is traditionally served on a section of ti leaf. I don’t have ti leaves available so I decided to use an origami leaf instead. Finding a pattern for the leaf was easy. A quick internet search turned up both written and video instructions for how to make this leaf. Finding the right paper took longer. I wanted green paper that would stand up to the moisture in the haupia square and be stiff enough so that you could pick the leaf up off of a serving tray. I finally settled on opalescent origami paper which has a somewhat water resistant coating on it.

Haupia

25 servings

Ingredients

  • 2   13.5 ounce cans of coconut milk or 1 can coconut milk and 1 can milk
  • 6 tablespoons cornstarch
  • 6 tablespoons sugar
  • 1/4 teaspoon salt
  • 1/2 cup water
  • coconut (optional)
  1. In heavy bottomed 1 1/2 quart saucepan, mix cornstarch, sugar and salt thoroughly.
  2. Add 1/2 cup water and stir to make a paste.
  3. Add milk and stir.
  4. Place on medium high heat and bring to a boil stirring constantly especially as the mixture nears the boiling point. Use a spatula so that you scrape the bottom as you stir. The mixture will thicken on the bottom of the pan first and will be lumpy if not stirred well.
  5. Remove from heat when first bubbles from boiling appear.
  6. Pour into 9″ square pan. Top with coconut flakes if desired. Chill. Cut into 5 sections each way.


{ 0 comments }

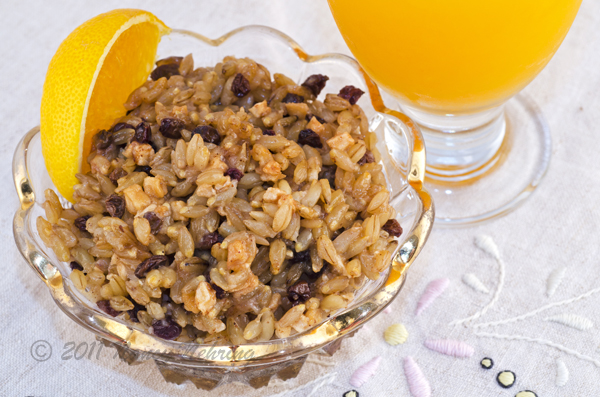
There are a whole range of grains that have been and can be used as food but are not commonly consumed in the US. Barley is one of those grains. Historically is was grown worldwide but was especially important in northern climates with short growing seasons (such as Iceland) as it doesn’t need a lot of heat to grow. Today it is grown in the US but nearly all of the production goes into animal feed and malted barley for beer making.

Last March my son, Scott, and I went to a convention and did some touring in Iceland. The hotel restaurant served a barley dish for breakfast. It was right next to skyr, a traditional Icelandic yogurt/cheese, and served in the same style container but I never determined if this breakfast barley was considered a traditional dish or not (like several places we visited in Iceland, the staff was seasonal help from elsewhere in Europe and didn’t know). It was the first time I remember eating barley other than those little bits in Campbell’s vegetable beef soup.

The only real challenge to this recipe was finding a source for barley and learning how to cook it. This recipe uses whole grain barley which may also called hulled or hulless barley depending on the variety grown. I can buy barley at my local natural foods store in the bulk bin section. It is also available by mail order from Bob’s Red Mill. Whole grain barley takes a long time to cook and is always chewy even when fully cooked.

We’d like to thank Bob’s Red Mill for providing the barley, dried apples and black currants for this recipe.

Icelandic Breakfast Barley

four 1 cup servings

Ingredients

  • 1 cup Bob’s Red Mill hulless barley
  • 4 cups water
  • 1 teaspoon butter or margarine
  • 1/4 teaspoon salt
  • 1/3 cup Bob’s Red Mill diced, dried apples
  • 1/3 cup Bob’s Red Mill black currants
  • 1/4 cup honey
  • 1/2 teaspoon cinnamon
  • 1 teaspoon finely grated orange peel (optional)
  1. Place barley, water, butter or margarine, and salt in a 2 quart saucepan for stove top or 3 quart bowl for microwave. (The butter or margarine keeps the water when mixed with small amounts of starch from the grain from boiling over.) Cover. Bring to a boil then reduce heat and simmer 90 minutes. Ideally all of the water should just be absorbed as the barley finishes cooking. Check near the end of cooking time and add boiling water if the barley is too dry or remove the lid if the barley is too wet. When cooking barley in the future, adjust water and/or cooking time as needed.
  2. While still hot, stir in dried apples, currants, honey and cinnamon. If there is a layer of starch on top of the barley when cooking it in the microwave, just stir it in with the apples and currants. Let stand 10 minutes. Serve hot or cold.


{ 0 comments }

Risotto and Roasted Asparagus

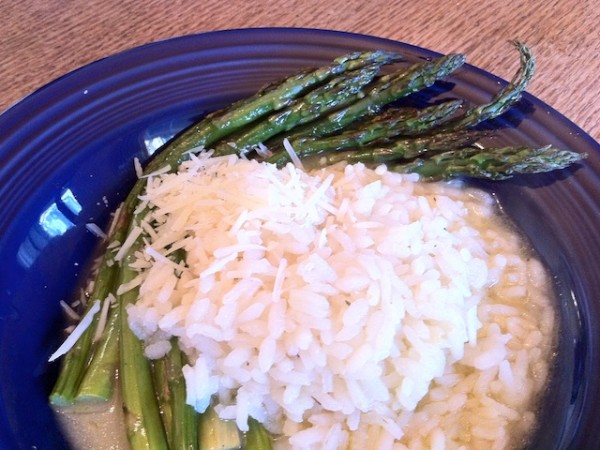
When I was a kid, a family friend gave me a gift of a copy of Alice Water’s Fancy at Chez Panisse children’s cookbook. It’s a beautiful book with great recipes but I was a picky kid and the only thing I wanted to cook out of it was the risotto. The risotto was amazing though and has become a long standing favorite recipe of mine so when my picky eater fiance requested risotto to be on our menu for the week I knew this was the perfect recipe to make for him.

Risotto

serves 4

  • 2 tablespoons olive oil
  • 1 tablespoon butter
  • 1 bay leaf
  • pinch of thyme
  • 1 cup Arborio rice
  • 4 cups chicken broth
  • salt and pepper
  • Parmesan cheese
  1. Melt the butter over medium heat in a large sauce pan. Add one tablespoon of olive oil and heat.
  2. Add the Arborio rice, bay leaf, and thyme. Cook for 5 minutes while stirring often.
  3. Add just enough broth to cover the rice (1 to 2 cups). Bring to a boil then turn the heat down and simmer for 10 minutes.
  4. Add the rest of the broth, one tablespoon of olive oil, and salt and pepper to taste and cook for another 10 minutes.
  5. Remove the bay leaf. Ladle into bowls and garnish with Parmesan cheese.

This recipe is pretty basic and plain but like the fried rice recipe my mom posted recently you can throw in any meat or vegetables you have hanging out in your fridge. You can also easily make this recipe vegan by substituing an additional tablespoon of olive oil for the butter, vegetable stock for the chicken broth, and skipping the cheese.

We’re pretty cleaned out on leftovers right now so I made a side of roasted asparagus.

Roasted Asparagus

serves 4

  • 1 bunch of asparagus
  • 1 tablespoon of olive oil
  • salt and pepper
  1. Wash and trim the ends off of the asparagus.
  2. Drizzle with olive oil and sprinkle with salt and pepper.
  3. Get your hands in there and spread the olive oil all over the asparagus.
  4. Spread the asparagus out on a rimmed baking sheet and bake at 450 degrees F for 15 minutes.

{ 0 comments }

Oat Date Muffins

by Nancy on July 12, 2011

in Breads,Snacks,Vegetarian

About 25 years ago I occasionally worked in southern California, inland near the Salton Sea. On one trip the group I was with stopped for a travel break at Hadley Dates on I-10 near Indio. It was a small run-down building used as a packing house with a gravel parking lot for a half dozen cars. There were about 20 women stationed along 2 conveyor belts sorting and packing dates. On a counter were samples for us to taste and a few items for sale like boxes of dates and mixed dried fruit trays like you see at Christmas. I vividly remember two things about this stop. First, I tasted my first Medjool date. It was the perfect eating date – large, soft, and sweet. Second, one of the products for sale was date sugar. I’d never heard of date sugar. It is just very dry dates ground to a powder and used like sugar. I purchased two items that day, a box of Medjool dates and a pound of date sugar.

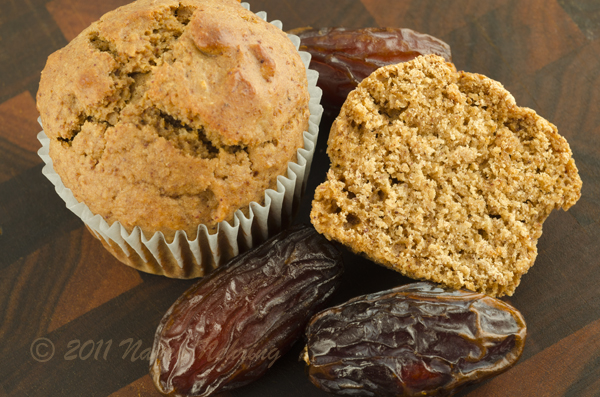
With date sugar in my cupboard, I now had to decide how to use it and eventually came up with a recipe for oat date muffins. These are what I call traditional muffins. They are barely sweet muffins that are more like bread and designed to eat with a meal. They aren’t sweet like Costco muffins that are more akin to cake. Not that I don’t like Costco muffins, they’re just a different type of food. My first attempt came out dry so I wanted to add some oatmeal to make them moister. They were still dry so I decided I needed oat flour. I ended up grinding oatmeal into flour in my blender. When I later ran out of date sugar I had to grind dates into sugar too. The process was a lot of work so I didn’t made oat date muffins very often.

Recently while looking for some other ingredients I discovered that Bob’s Red Mill made both oat flour and date sugar and if I couldn’t find them locally where Bob’s Red Mill products are sold I could mail order them. Oat date muffins are now back in my menus!

PS – Last winter I was down in the southern California desert again and wanted to see if Hadley Dates was still there. I really expected that it would be gone or, because it was so small, I would miss it. Not the case! Hadley Dates has expanded into a tourist stop complete with freeway sign, large sales room, snack shop serving date shakes and enough parking for tour buses. Unfortunately the packing operations which were my favorite part have been moved.

PSS – A couple of weeks after I mentioned to Carrie that I found oat flour and date sugar at Bob’s Red Mill, she was attending the BlogHer Food conference where Bob’s Red Mill had a display. The people at Bob’s Red Mill graciously sent us samples of some of their products so we will be mentioning Bob’s Red Mill, using Bob’s Red Mill products, and thanking them for samples in some of our upcoming recipes. Thank you to Bob’s Red Mill!

Oat Date Muffins

Makes 12.

  • 1 cup Bob’s Red Mill oat flour
  • 1 cup flour
  • 1 cup Bob’s Red Mill date sugar
  • 1 tablespoon baking powder
  • 1 teaspoon salt
  • 1 1/4 cups milk
  • 1/3 cup vegetable oil
  • 1 egg
  1. With spoon, mix dry ingredients.
  2. Add wet ingredients and mix just until blended.
  3. Grease muffin tin if not using paper liners. Spoon mixture into muffin cups.
  4. Bake at 400 degrees for 20 minutes.

{ 0 comments }